Page 3 of 3

Clothing Brainstorm

Goals

  • minimal or self determined cost
  • minimal environmental impact
  • durable
  • customizable
  • creative

Brainstorm

Clothing Items

If group members bring their own clothing, they can determine the cost and style that they are most comfortable with! Buying second hand reduces environmental impact, and can be a fun group activity.

ItemProsCons
Toques/Bucket Hats– can be made by members with knitting, crochet, and sewing -> opportunity for skill share
– great outdoor wear
– extra step to coordinate time together and source materials if making
5 Panel Hats– very cute on everyone– need to be ordered (minimum order), likely need to be machine embroidered
– cost
Bags– lots of different styles
– usable in many settings
– easy to decorate and personalize
– lots available in second hand stores
– tote bags and drawstring bags are a great skill share
– extra step to coordinate time together and source materials if making
T-Shirts– easy to find new and used
– easy to personalize
Button Up Shirts– easy to find new and used
– variety in formal and casual
– easy to find shirts with cute fabric designs!
– can be harder to customize (small front space, or large back space)
Hoodies and Crewneck Sweaters– lots of space to customize
– cozy

– cost if new
– hard to find blank used ones
Socks– subtle– hard to customize

Decorating

Many companies do custom screen printing, embroidery, and vinyl pressing; however, they often require you to have item minimum order size and for the items to be uniform which takes group consensus. By self-customizing you can reduce cost, increase autonomy/creativity, and do group skill sharing!

Method ProsCons
Silk Screen– skill share
Block Printing– skill share
– low cost
– can easily reuse stamps to share patterns with each other and use same design on multiple objects
– can edit the designs
– can layer and combine designs
– lots of colour choices
– can’t undo mistakes, must go over them
– items must lay flat under stamp (hard to add to backpacks)
– hard to be very detailed
-often limited to a couple colours/design because it’s difficult to accurately overlap
Heat-Press Vinyl– skill share– materials can be expensive
– materials may have colour limitations, would need to agree as a group
– creates waste
– often cracks, especially if worn frequently in sunshine
– need access to CriCut (or professional ordering, would likely need to order items from provider)
– hard for multiple people to work at same time
Hand Embroidery– skill share
– entirely customizeable
– all can work at same time
– easy to fix mistakes
– can buy/make templates
– light, easy to bring backcountry camping as a downtime activity
– thick materials are difficult to embroider on, easier to make patches
– time consuming
Machine Embroidery– can make patches that can be sewn onto any item
– low cost, just need thread
– need access to an embroidery machine
– can only do one item at a time
– limited to thread colours

Pest Removal

Garden cleanup happens after first practicum. During the session, consecutive students (concurrent do not join until September) clean up garden beds and planters to prepare them for planting. Some beds will be so overrun by weeds that it’s not worth trying to salvage remaining plants from last year, but others will have established plants that you need to work around, such as milkweed that attracts butterflies and woad which takes 2 years to seed! Below, I highlight some of the plants and creatures that must be removed because they will choke and kill your vegetables!

Animal Pests

Spongy Moths

While digging, you might come across sponge moth cocoons. Pop them! If you, like me, are nauseated by the idea of popping with your fingers because they will spray you, put them on a hard surface and stomp them, or find a peer to do it.

Spongy moths are invasive; They originate from Europe, North Africa, and Asia and destroy local plants by eating their leaves. Their populations have been controlled and/or removed in most provinces, but they are still present in Ontario and Quebec.

Grub Worms

Do not be fooled by their name, grub worms are not wiggly friends with no legs! They are actually the larval stage of many beetles, and are recognizable by their orange head, creamy body, and legs at the front of their body. Not all grub worms are invasive, but they are all damaging to your garden! One type of grub worm is the larval stage of the native June beetle, but others are the larval stage of the invasive European Chafer and Japanese Beetle.

To kill grub worms, remove them from the garden and place them on a hard surface. Stomp them.

Plant Pests

Loosen the topsoil with a spading forks and start pulling out the plants. Be sure to keep as much soil as possible in the beds by shaking out the entangled roots. Then, once the soil is shaken out, place the plants on a tarp so they can dry out. Do not just leave on the ground! They will re-root and start growing again. One the visible plants are removed, use a hand cultivator to brush through the soils and expose the long, deep grass roots that will we grow if left untended!

Field Bindweed

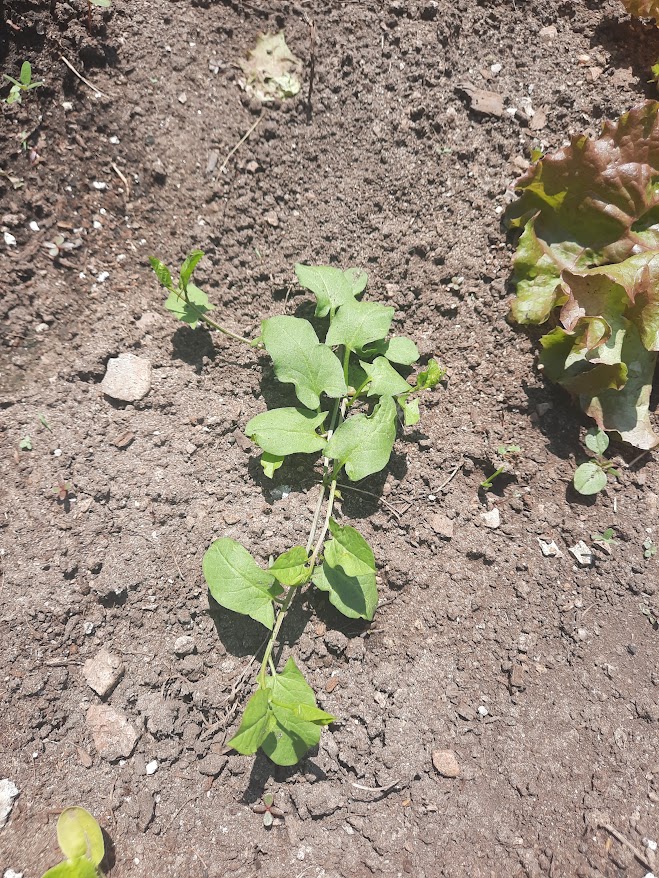
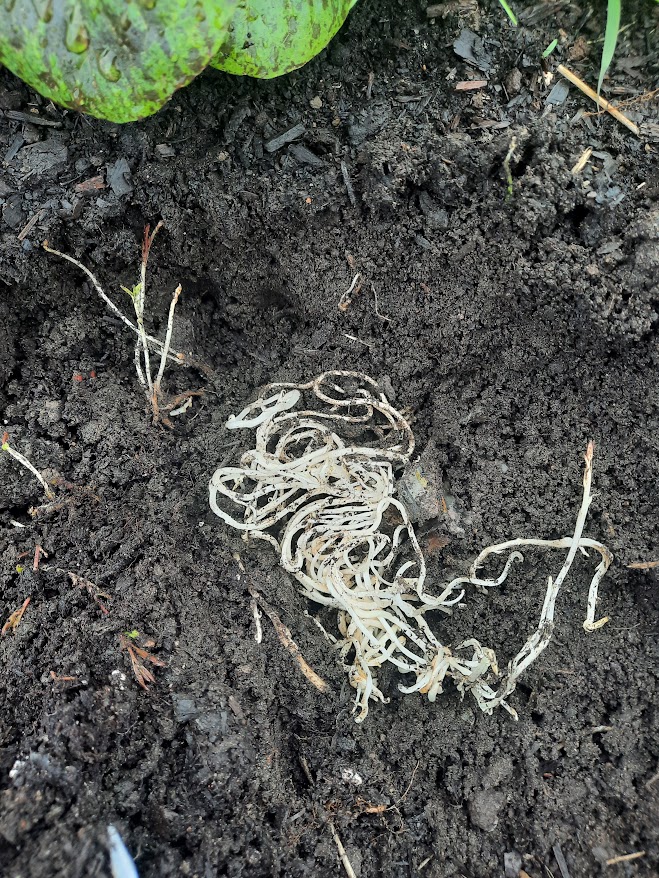
Field Bindweed is an invasive plant originally from Eurasia that was introduced to Ontario as an ornamental plant. Field bindweed is aggressive in the gardens; it grows deep, long roots (we found roots over 2′ long) that can be dug back to nest-like growths, and the vines with crawl up and choke out your crops. If you find some, you will likely end up digging up most of the garden bed to remove the ropey roots.

Be mindful of field that grows outside of the garden bed: the roots grow under the soil and up through the bed, and the plants extend over the barriers and pull down crops. Without trellises, the vines radiate from a central root and stay low to the ground, so they are missed by mowers and weed whackers. To locate field bindweed in the grass and prevent it from reach under or through te beds, or from spreading seeds, locate it with the white, cup-like flowers and trace the vine back to the central root.

Be sure to remove field bindweed as you see it while watering or going by the gardens because it grows very quickly!

DSV after less than one week unattended
DSV Roots, often occur in small “nests”
DSV Flowers

Grasses

Not all of the grasses on campus are invasive grasses, but they are all annoying in garden beds and tough to remove. Unlike Japanese Knotweed, grasses have thin, dense roots that makes it difficult to save the soil. When removing grass, use a spading fork to get below the surface roots and lift. Then, you can pull large chunks at a time and shake the soil out of their roots

Stinging Nettle

Stinging nettle can be found all across Canada and is not invasive! It is up to you to decide if the benefits outweigh the discomfort, and to consider how keeping the plant contained affects your decision. Stinging nettle has hairs along the stem and underside of the leaves, which, when brushed up against, cause immediate stinging sensation followed quickly by raised welts. Over a few hours the welts usually become red-ish before fading away. The stinging sensation, depending on the exposure, can last a few minutes to a couple of days.

With careful handling, stinging nettle leaves can be boiled for a tea rich in vitamin C, and the stems can be made into cord!

Resources/Further Reading

Where to Find, Where to Water

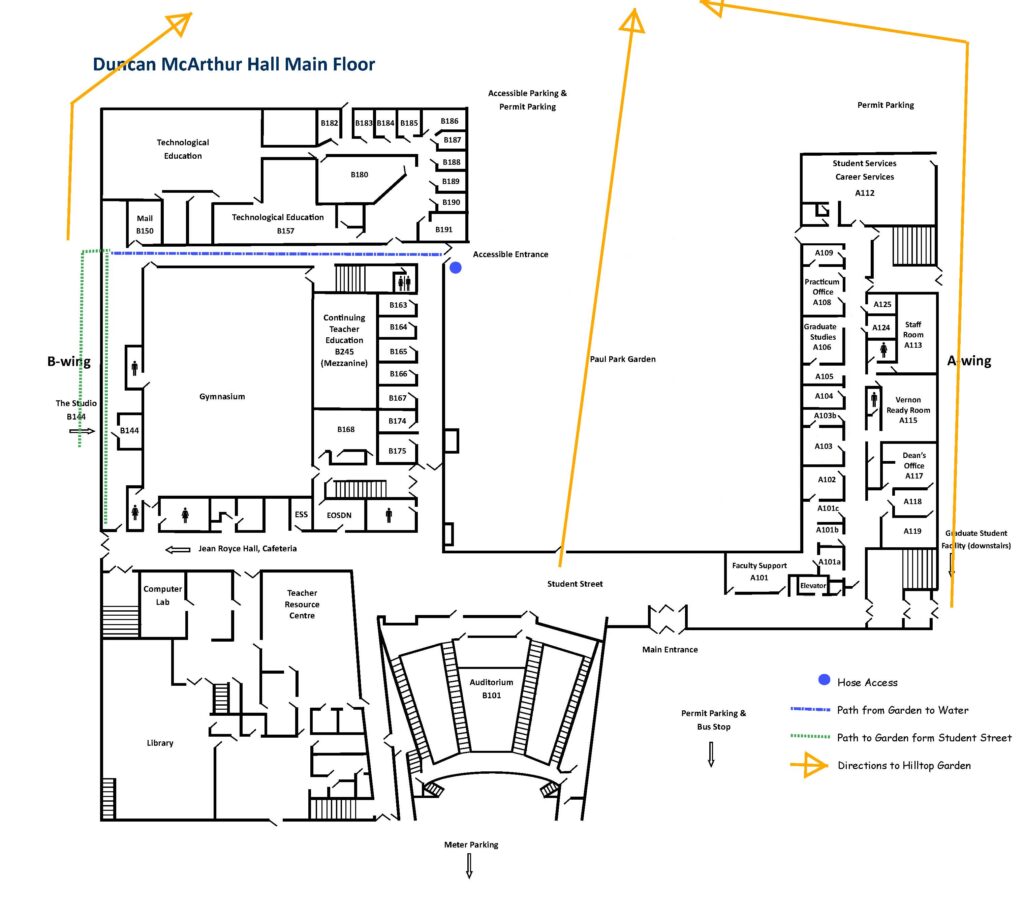
Map of Duncan MacArthur Hall, edited from Queen’s PDF to show directions to gardens and watering stations

Nestled Garden

The nestled garden is not directly accessible from the building because doors are often locked. Instead, go down the hallway The Studio is in, out the left hand doors, and through the gate. There are three large rectangular beds, a small triangular bed, and many window boxes and other containers.

Because of the surrounding buildings, the nestled garden receives ample shade in mornings and evenings, and harsh direct sunlight midday.

There are three active rain water collection barrels in the nestled garden. Before watering, be sure to check the right hand rain barrel and empty from it first because it receives the run off water from the middle rain barrel. If (when) the water in the middle rain barrel runs out, water must be collected.

Collecting Water

During Summer months, Kingston experiences drought-like conditions. Because of this, the water collection barrels will run out ~weekly with consistent bed watering. To refill the water beds, email edhelp@queensu.ca at least one day in advance to secure a cart to help move water.

During the organized window, bring available empty buckets inside to the cart and wheel it through the Tech Ed hallway and out to the Paul Park Garden breezeway. Locate the hose immediately to the right of the doors and fill the buckets. Then, push the loaded cart back across the hallway and carry each bucket through the doors. Empty the buckets into the rain barrels.

I recommend leaving the cart halfway through the second set of doors so you don’t have to pull the full cart over the lip while also trying to hold the door open for yourself. I also recommend assigning this weekly task to a team of 2-3 people so they can set up a regular time to have the cart available.

Watering Woopsies

*these instructions were written before knowledge about the hose beside the ITEP gardens*

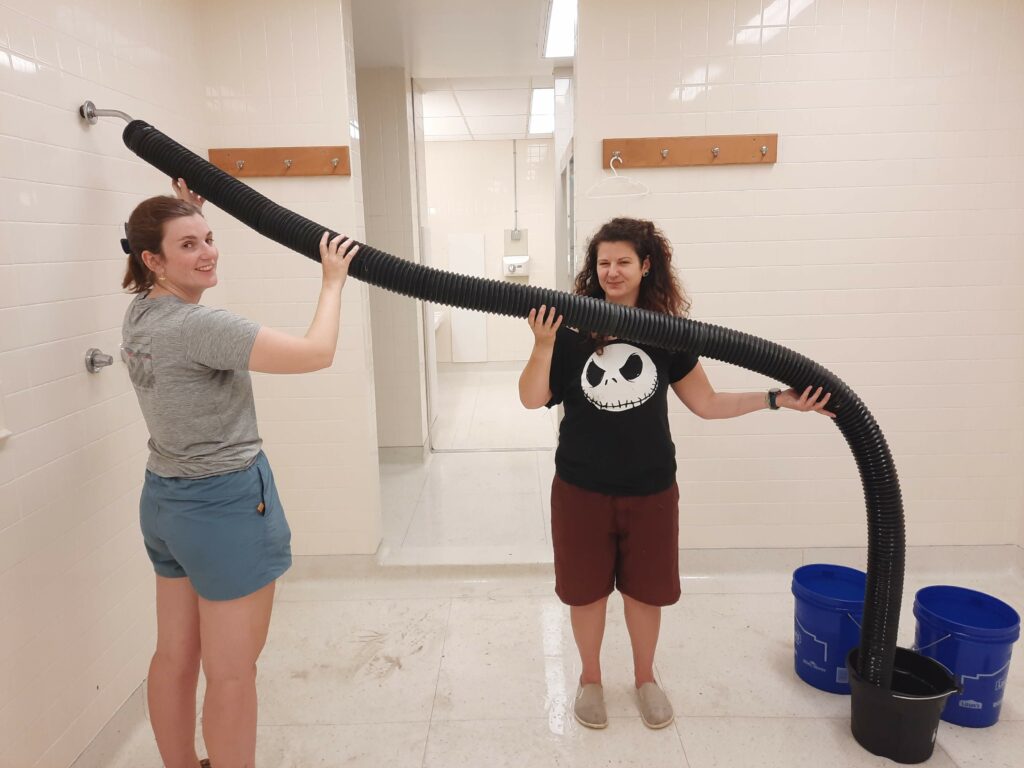
To collect water from indoors, first collect a few buckets and a large tube from beside the shed. The, navigate to the change rooms inside. The large tube fits over the shower head, but has a toonie-sized hole in it so you must be mindful of how you hold it while filling buckets. Use the door that attaches to The Studio hallway instead of carrying buckets through the gym and along Student Street.

Hillside Garden

The hillside garden has multiple water barrels; however, the rainwater collection is currently broken. During first session, be sure to fill the barrels with the hose beside John Orr Tower. Always make sure to return the hose and ensure it is packed away nicely! The program can lose water access privileges if it is damaged or put away messily.

The hillside garden features 8 garden beds, and two of them are reserved for other Queen’s community use. Because of rock base, the garden beds are shallow, so we recommend planting fibrous root vegetables such as pumpkins and corn, instead of taproot vegetables such as carrots.

About the Blog

My name is Liz and I am a member of the Queen’s OEE program. I started this blog to chronicle my experiences within the program, and provide an idea of what to expect for incoming OEE students. What I write on this blog is not what future students have to do! Each year, OEE students take on different responsibilities, contribute to the Queen’s community with their own interests, and find new ways to fulfill the open-ended assignemnts!

Newer posts »